Discription

Everything Southern & So Cotton Pickin Cute
Showing posts with label Painting. Show all posts

Friday, July 12, 2013

The Easiest DIY Sewing Project Ever

Happy Friday y'all!  How about a crafty project.  My motto is if you can't find it, can't afford it, then make it for nearly nothing. Upcycle, renew and reuse.  I made an easy pillow for the 4th using what I could find on hand.


I made one a little different last year.


The thing to remember here is you don't have to limit yourself to a patriotic theme.  You could easily paint waves instead of stripes.  Or maybe keep the strips and add a crescent moon with stars.  Heck paint some butterflies or dragonflies.  I have to keep it really basic because I'm totally not talented when it comes to painting.  Oh' but wouldn't wedges of fruit like oranges, limes and lemons be cute!

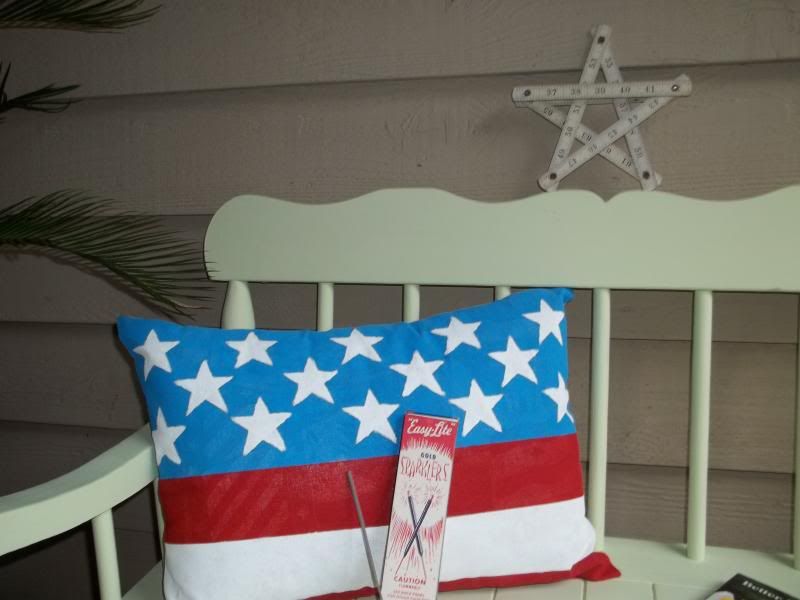
Here's a picture of my inspiration. I think I found it on Pinterest but it was created by Kierste over at Simply Kierste.  She is one crafty girl with a great blog.  She gave a tutorial and I basically followed her directions with a few variations.  Please click here to see her post.  I know you'll enjoy her blog as much as I do.  I adore her pillow.


I thought I'd show you the basic's on making these.  Lets start with this years painted pillow.

  • Step 1:  Use any old fabric you have on hand like I did.  A burlap or muslin works great.  Decide how big you want your pillow to be.  I wanted mine to be a rectangle since it would be a flag. I decided that I wanted my finished pillow to measure 19" x 14".  Before cutting it out I added 1" to each measurement for seam allowances.  Fold your fabric in half before cutting. I cut mine 20" x 15".
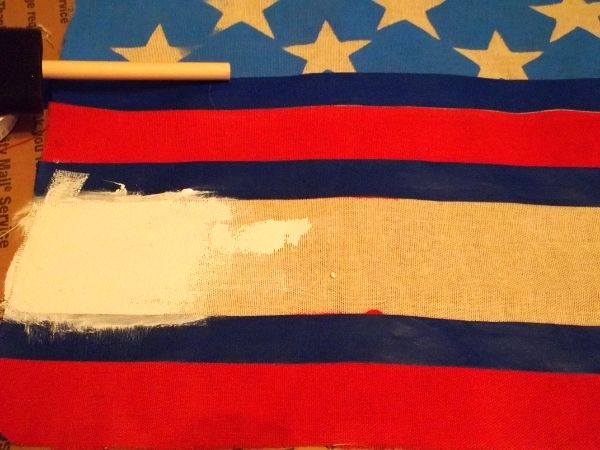
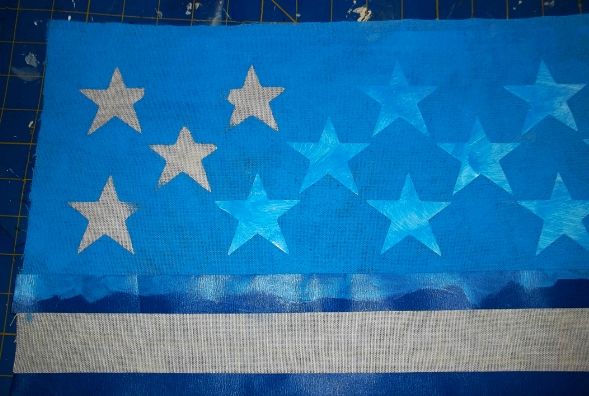
  • Step 2: On just one piece of the fabric measure out your placement.  I decided to have "3" stripes at  2 1/2" each.  That left 6 1/2 on the top for stars.  Using painters tape, tape each section being sure to use a spoon or something to really press the tape edge tight so paint doesn't seep under.  Don't worry if it does you can touch it up with a art brush.  I don't plan on washing these and since they're under a covered porch I didn't use fabric paint.  I just used craft paint, you can even use house paint.
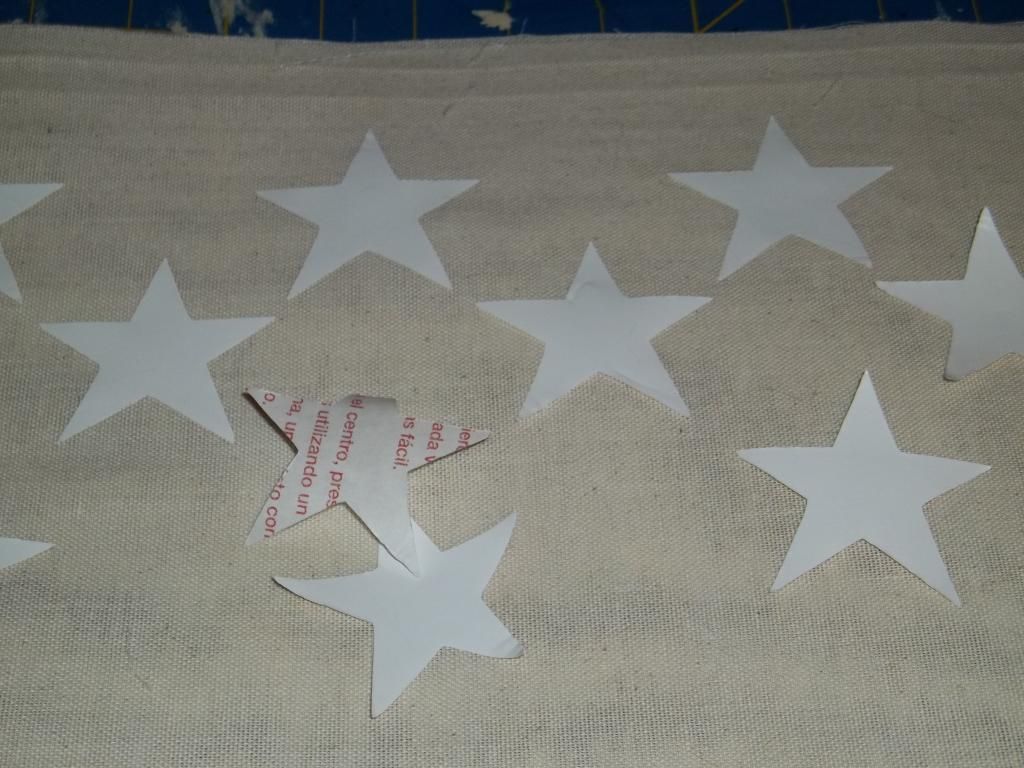
  • Step 3:  For my stars I used cheap vinyl shelf paper from the dollar store and cut 2 1/4" stars on my cricut.  You could also print a star shape from the internet and make a cardboard template and trace your stars but you would have to paint the blue first, unless you want to do a lot of tedious painting around the stars.  TIP: Be sure to put cardboard under your fabric before painting because it will seep through.

  • Step 4:  I half measured and half eyeballed my stars placement stuck them to the fabric and then painted the blue right over them. It would have been nice if I would have had a little foam roller but I didn't so I used a foam brush.  The brush did cause the edges of the stars to peel up a bit and the paint to get underneath.  Because of that I used a small paintbrush to paint the stars white.  I had originally planned to just leave them the natural fabric color. 
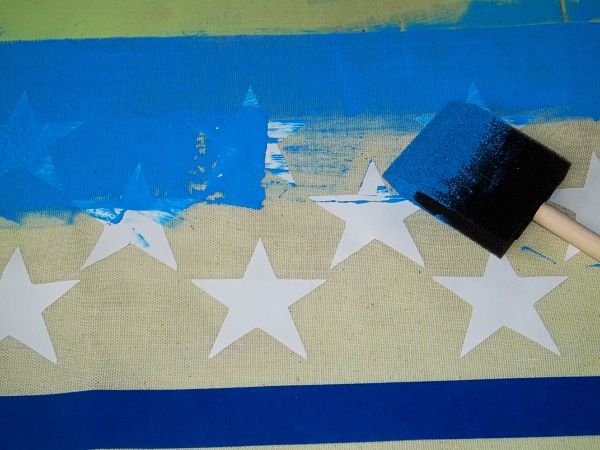
  • Step 5:  I carefully pulled the vinyl up while the paint was wet.  Once dry, I painted the stars white. You can also paint your white stripe now.  Once the white dries tape over the white and blue so you can paint your red stripes. Let dry.
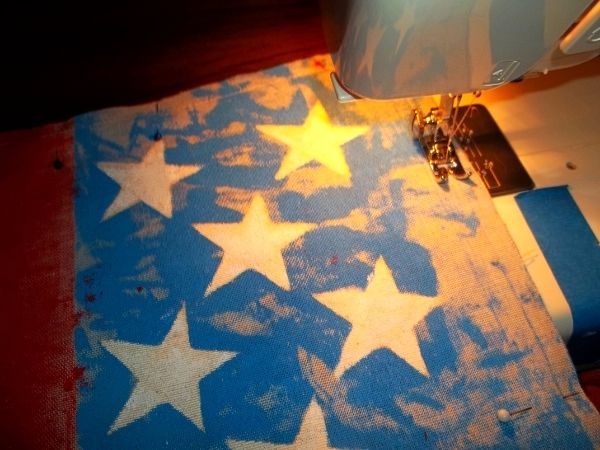
  • Step 5:  Time to sew.  My fabric doesn't really have a right and wrong side but if yours does pin right sides together and stitch 1/2" seams. It doesn't get much easier than stitching straight seams.  Be sure to leave an opening in the bottom big enough to add your pillow. *NOTE:  You can use double sided hem tape or even fabric glue or a glue gun if you don't want to try sewing.
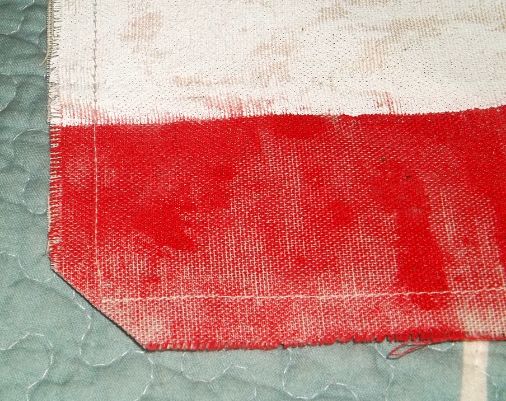
  • Step 6: Turn your pillow right side out.  Trim corners like I've done below being careful not to cut through stitching. Use the end of a spoon or fountain pen to push the corners out completely.
  •  Step 7:  Press you hem opening so it will be ready to sew after stuffing.
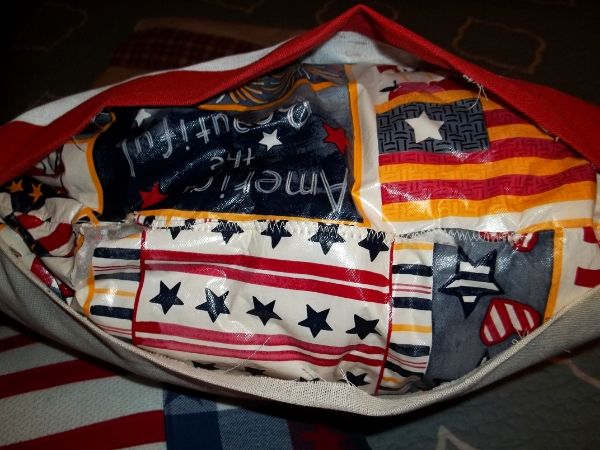
  •  Step 8:  You can do like I did and use an old bed pillow.  I just cut one 14" down from one end and most pillows are 15-18" wide.  Sew up the end of the pillow (the other 3 sides are already sewn).  To water proof my stuffing I used an old vinyl table cloth.  Yea, I never throw anything away.  You could also use 2 plastic grocery bags putting then on in opposite directions.  Bags don't need to be sewn but I did sew the table cloth around the pillow.  The just stuff it in there.  Pin your seam closed and then simply hand stitch or machine stitch closed.

The smaller flag pillow was basically the same steps but instead of using paint I sewed a bit of patriotic plaid fabric that had stars and red seam binding for the strips.  It was stuffed with loose batting.
 

I hope you decide to make your own pillow.  It really is easy.  If you make one please come back and let me know because I'd love to see it too.

Stop back by tomorrow to see another before and after project.

Hugs Y'all...

♥ Tracy 
P.S.  Don't forget to come back Monday when the 5 day giveaway starts.  It's our first Celebrate Summer Giveaway!!  Amazing prizes worth $450! **Update: This giveaway has ended.


Sunday, July 1, 2012

My new Great Clips Hair Cut and Lots of Painting

Remember my Great Clips Giveaway a few weeks ago?  Well included in that giveaway was a gift certificate for a free haircut and I finally got to go get mine cute.  And it feels so much better now.

The stylist that cut my hair was wonderful and she didn't even know that I was there because of Great Clips.  It was kind of like a secret shopping mission for me.  I just wish I could remember her name.  She really took her time with me.  No kidding, she spent over and hour on my hair.  She was very precise and had the sweetest personality.  On top of that there was no wait at all! 

I've spent big money on my hair before and can promise you I didn't get this kind of attention to detail.   I love that she listened to me and left the from long enough to pull back in a clip when I need to (sometimes it just drives me crazy.  Other days I can leave it down for a little more pulled together look.  The backs off my neck so I stay nice and cool in this tropical climate all summer.  Plus it's so easy to style.  In my book - that's a must.  

This is my cousin Greg with me.  We grew up playing together and have been close ever since.  Greg was sweet enough to go with me and Neil to Callahan to get some work done.  We stopped by the cemetary where our Grandma and Granddaddy are buried.  It was the first time I've been there since I was 15 in 1975.  Our grandparents died only 2 months apart.
West View Cemetery Entrance
How do you like the paint we chose for the office?  Just kidding!  Oh' my this was some paint job.  We have an office building in Callahan about 40 mins from where we live.  The last renter was a young lady who made and sold jewelry.  This is a LITTLE bold for my taste.  Hot pink with Zebra duct tape as border around the baseboards, ceiling doors and window.
What about the black wall as an accent?  Eeekkk.....We had our work cut out for us.  It ended up being a long day.  We painted to coats of Kilz on and then one coat of paint and it covered like a charm.

My biggest mistake of the day was NOT getting an after picture.  By the time the painting, vacuuming, mopping and cleaning the bath was done, oh yeah and loading the car, we were all whipped.  We are so grateful that Greg spent his day helping us.  We would have been there way longer if we had done it by ourselves.

We weren't too tired to all go home and then go back out for dinner at the Golden Coral that night.  We had went to Callahan on Wednesday, and Thursday was Greg's birthday.  I had over done on Wednesday and couldn't even get out of bed Thursday so we had to have a late celebration.

Saturday I was back over at the other house painting, while Neil worked on replaces the bath subflooring.  We've still got more painting, plumbing, flooring, and yard work to do.  My sister and her family are moving into it.  They're coming from TX and should be here Wednesday.  We can't wait.  I think it's going to fly by because we have so much work to do.  It's only a little over a mile away from us. Stayed tuned for more on that.

Have a blessed Sunday Ya'll....Tracy

P.S.  Don't forget to enter my giveaways on the right side bar.  Just click the picture to go enter.  The VTech phone is awesome!!!

Saturday, February 18, 2012

Pantry Makeover - Organized and Pretty - On a Budget

Photobucket
(After Photo)


I have to admit this was actually done by Christmas but I'm just getting around to posting it.  I've always been someone who likes everything organized and front facing but now it's even prettier.  At least I think so.  After seeing all the wonderful pantry makeovers, I decided mine could use a little primping.   Look at the photo below and you can see why.
Pantry Before 1
(Before photo)


We have a little of everything in there.  Flashlights, tile, floor cleaner.  And worse of all, just plain ugly walls.
Photobucket
I didn't have a stencil so I printed the pattern I wanted off the Internet.  Pattern, ha!  It was more like just one of the Moroccan shapes.  After painting the walls and shelves, I traced each one of those little diamond looking shapes in pencil.  Yep, one-by-one.  This was no one night job people.  I traced and painted one section of wall between shelves each day.  I used a paint brush to paint traced pencil lines.
Photobucket

I put popcorn in one basket for easy access, I've got Ritz crackers in another (we eat lots of those).  I have the instant grits in a little wooden bowl.  The big strawberry basket holds my potatoes. 

In the spirit up up-cycling, I took my old glass spaghetti sauce jars, pickle jars or whatever other jars I had and gave them a makeover too.  First I had to get rid of the mis-matched look by spray painting the lids red.  Then I used my cricut to cut some labels out of chalkboard sticky paper.  That way I can just wipe the name off the container and re-write it when or if I change its contents.  I used some ribbon to style them up a bit.  I would like to get some square glass containers later but I think these came out cute and will do for now.
Photobucket
I keep the un-opened boxes of cereal on the top shelf and we put the open ones in plastic pour containers.
Photobucket
The big black thing on the wall is actually the electrical breaker box. It was that old battleship grey metal and I painted it with chalk board paint. Since it's metal, it's a great memo board that magnets stick to. At least now it can be put to good use and used jotting down notes or shopping list.

I used my hot glue gun to glue shells over all the screws that hold the electric box up.  I just did a center shell collage for fun at the top.
Photobucket

Photobucket
So now I have a new pantry to go with my rustic market pantry sign I made this week.  Click here to see the sign.Photobucket
I bought the paper organizer that's on the door several years ago.  I think I got it at garden ridge, it was under $10 and it's been one of my favorite organizing items.  It holds plastic wrap, aluminum foil, and paper towels.  The wire basket is actually meant to hold plastic lids but I thought it would be perfect for the plastic Ziploc bags. 
Photobucket
We keep the cat food in a plastic laundry detergent bin.  Perfect for storage.

Well that's my newly improved pantry.  What do you think? Not bad for the cost of paint and some elbow grease.  It feels so good to have everything neat and clean.  And since I did this in December, I can tell you, it's stayed that way too.  I still like to just stand there and look at it sometimes.  At least one little corner of my world is organized.
Have a great weekend ya'll.
Hugs...Tracy ♥

I've add the links below to some of the fun parties I've join. 


Funky Junk's Saturday Nite Special


Friday, July 8, 2011

New Molding and Lots of Prep ~ Room Redo

If you see a smile on my face, it's only because I'm dreaming about how much brighter my house will look when we're through.  Actually I'm usually a lot  happier when I have a project to do, as long as I don't have to do it by myself.  So with me and Neil working together I'm pretty happy right now.

We added crown moldings a few years ago when we first remodeled this area of the house but we never got around to the windows and all the little finish up details.  Here's the windows before the molding was added.
Pretty Plain and dull.  Neil bought the trim pieces and trimmed them out just a few weeks ago.  No one ever said we were fast.  In the next pictures you can see the new trim which hasn't been painted yet.

It's a really open house with all the walls we removed when we started this project years ago.  No body ever believes that this is actually a 1920's house.  All new walls and bigger rooms with all new trim made a huge difference.  If you look at my old house photos part 1 here and part 2 here, you'll see what I mean.
I'm standing in the dining room side of the archway Neil created between the dining room and the living room.  It used to be the bathroom.
I really love the trim color but I would have liked to have gone to a shade of white.  Not the bright white of the window trim above.  But with this much trim, I had said I would never paint it again and I am so glad that I don't have to.  I'm mudding in all the little cracks and all around the new window trim (these things happen with an older off grade (i.e. above ground) house.  We bought a paint shade that will work with the trim so there may be a little trim touch up, but it would take forever to paint all the trim in these two rooms if I changed colors.  So yea for keeping it the same.
In the photo above you can see some of the new window trim.  Neil still has to get some trim to go between each set of two windows.  We have 3 sets = 6 windows across the front of the house, that includes the joining living room and dining room.

I always dread starting projects like this, especially mudding and painting.  There's so much clean up.  But once I get started I enjoy it.  It gives me a fresh clean feeling and I get nice and worn out so I sleep really good.  I just can't wait to see the new color.  Now, does anyone know where I can win a shopping certificate?

I can't believe Friday came so fast this week.  Ya'll have a fun weekend!
Hugs...Tracy :)
Quote of the Day

"If you hear a voice within you say, you cannot paint," then by all means paint, and that voice will be silenced."
         ~Vincent Van Gogh (Birthdate March 30, 1853)
{Okay maybe this wasn't exactly the painting he had in mind.} LOL